Hacking on my finances (Part 2: Beancount on Beanstalk)
In part 1 of this series, I talked about the setup that I'm using to manage my finances and investments. In this part, I'll talk about how I migrated my accounting setup to the Cloud, and what I have learned in the process.
The goal: Accessing my finances from anywhere
Currently, I manage my finances using beancount, a Python based plain-text accounting library. It allows me to create a personal ledger (aka, the beancount file), and then visualize my assets and expenses using Fava - a web interface/explorer for it.
Although it works great in my machine, I envisioned something a bit more streamlined where:
- I update the ledger file locally
- I commit the changed file to a private repository
- The
beancountfile is validated ("bean-check runs without problems") - I can access the fava web interface from anywhere
- The web interface is protected (I don't want everyone analyzing my finances)
- Every time I commit a new beancount file, the fava web interface should update
My goal was to automate this sequence of events, and to take maximum advantage of Cloud technologies during that process.
To do it, I used a combination of Fava, Docker, GitHub Actions, AWS Elastic Beanstalk, and Cloudflare.
Here's a sanitized version of the repo containing all the necessary files.
And a simplified view of the architecture (using excalidraw):
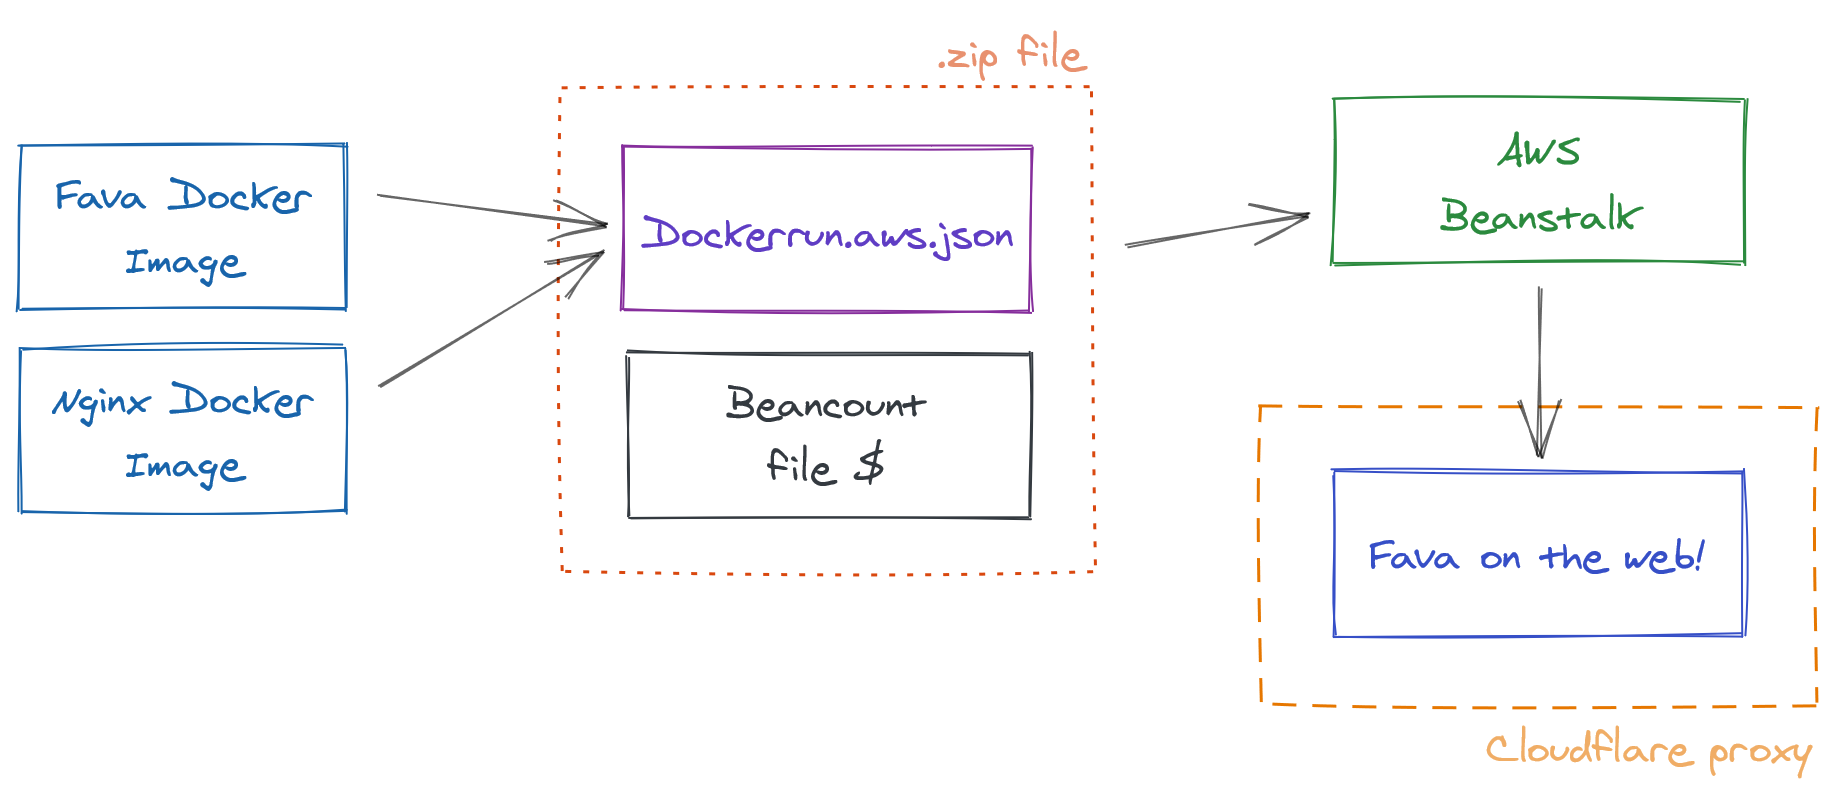
Step 1: Using Docker to containerize the application
For the deployment, I'm using two Docker containers:
- A containerized version of the Fava web interface that takes a
beancountfile as input and exposes the web interface - A docker image that provides an NGINX proxy with user-password authentication
To test it in my local machine, I created a docker-compose.yml file with both containers:
version: "3.7"

services:
  fava:
    image: yegle/fava
    volumes:
      - "./:/bean"
    environment:
      # assuming you have a filename.beancount in the current directory
      BEANCOUNT_FILE: /bean/filename.beancount
  auth:
    image: beevelop/nginx-basic-auth
    links:
      - fava:fava
    ports:
      - 8000:80 # yourmachineIP:containerIP
    environment:
      FORWARD_PORT: 5000
      FORWARD_HOST: fava
      # Use this link to generate your credentials: https://hostingcanada.org/htpasswd-generator/
      HTPASSWD: "foo:$apr1$odHl5EJN$KbxMfo86Qdve2FH4owePn."
Once that's set up, I can run docker-compose up, and the application will be running in http://localhost:8000.
Now let's talk hosting.
Step 2: Beancount on Beanstalk
Disclaimer: I'm not a Security expert - and cannot assure this setup is 100% private and secure. Can anyone though?
I spent some time browsing for the best options to deploy a docker-compose.yml file, and decided to go with AWS Elastic Beanstalk. Mostly because of this awesome video, and some great documentation from AWS.
You'll notice that instead of a docker-compose.yml file, AWS requests a dockerrun.aws.json file, they are very similar actually. It's just Amazon's way of keeping you locked into their service. Sad.
Click here to expand the dockerrun.aws.json file
{
   "AWSEBDockerrunVersion":2,
   "volumes":[
      {
         "name":"fava",
         "host":{
            "sourcePath":"/var/app/current"
         }
      }
   ],
   "containerDefinitions":[
      {
         "name":"fava",
         "image":"yegle/fava",
         "essential":true,
         "memory":128,
         "environment":[
            {
               "name":"BEANCOUNT_FILE",
               "value":"/bean/filename.beancount"
            }
         ],
         "mountPoints":[
            {
               "sourceVolume":"fava",
               "containerPath":"/bean",
               "readOnly":true
            }
         ]
      },
      {
         "name":"auth-nginx",
         "image":"beevelop/nginx-basic-auth",
         "essential":true,
         "memory":128,
         "portMappings":[
            {
               "hostPort":80,
               "containerPort":80
            }
         ],
         "links":[
            "fava"
         ],
         "environment":[
            {
               "name":"FORWARD_PORT",
               "value":5000
            },
            {
               "name":"FORWARD_HOST",
               "value":"fava"
            },
            {
               "name":"HTPASSWD",
               "value":"foo:$apr1$odHl5EJN$KbxMfo86Qdve2FH4owePn."
            }
         ]
      }
   ]
}
Next step is to bundle the both the filename.beancount and the dockerrun.aws.json files into a single .zip file, which can be uploaded to AWS Beanstalk directly.
And that's it, that's what is needed to run an authenticated version of fava in the web. Once uploaded, AWS provides a direct link to my protected fava instance.
But hold up, there's still a couple of things to automate.
Step 3: Using GitHub actions to automate the deployment
Logging into to my AWS console and uploading a new zip every time I change my beancount file is a pain. And I don't like pain.
To avoid this, I created a GitHub action that automatically watches the repo containing my beancount file and watches for changes in that file. If it changes, it then validates the ledger file, creates a new .zip version of the application, and uploads that to my AWS Beanstalk instance.
It uses this action as a base and adds a couple of features to it, like the validation of the ledger file for example.
Click here to expand the GitHub action
name: Deploy master
# run this if the beancount file changes
on:
  push:
    paths:
    - "filename.beancount"

jobs:
  # test this beancount file with the bean-check command
  test:
    runs-on: ubuntu-latest
    steps:

    - name: Checkout source code
      uses: actions/checkout@v1

    - name: Setup python3
      uses: actions/setup-python@v2

    - name: Install setup tools
      run: sudo apt-get install python3-setuptools

    - name: Install requirements
      run: python3 -m pip install beancount

    - name: Check beancount file
      run: bean-check $BEANCOUNT_FILE
      env:
        BEANCOUNT_FILE: filename.beancount

  # and deploy it do AWS beanstalk
  build:
    needs: [test]
    runs-on: ubuntu-latest
    steps:

    - name: Checkout source code
      uses: actions/checkout@v1

    - name: Generate deployment package
      run: zip deploy.zip -j $BEANCOUNT_FILE $AWS_DOCKER_FILE
      env:
        BEANCOUNT_FILE: filename.beancount
        AWS_DOCKER_FILE: deploy/Dockerrun.aws.json

    - name: Deploy to EB
      uses: einaregilsson/beanstalk-deploy@v14
      with:
        aws_access_key: ${{ secrets.AWS_ACCESS_KEY_ID }}
        aws_secret_key: ${{ secrets.AWS_SECRET_ACCESS_KEY }}
        application_name: YOUR_APPLICATION_NAME
        environment_name: YOUR_ENVIRONMENT_NAME
        version_label: ${{ github.run_number }}
        region: YOUR_APP_REGION
        deployment_package: deploy.zip
        wait_for_environment_recovery: 180
Once all of this is running in a private repo, every time I commit a change to my .beancount file, my Beanstalk application gets updated! (It's not instant, but its fast enough!)
Step 4: Securing everything with Cloudflare
Cloudflare is my go to tool to manage networking for all my applications. It gives me:
- DNS management (setting domain names)
- HTTPS encryption
- Website authentication and protection
- Firewall management
In a single place. Pretty insane.
Will not go in depth about all of the setup details here, but I can really recommend using Cloudflare. Awesome tool.
Final notes
This was super fun to put together. It took me some hours to get everything set up nicely. But I learned a lot in the process. The setup far from perfect, but works pretty well for my use case. And that's enough.
The whole thing costs about 4 EUR/month which is pretty affordable. I could also just purchase a VPS for 2 EUR/month and call it a day. But wouldn't learn much in the process.
I also created a sanitized version of the repo with all the files if you would like to hack around a bit.
Hope you found this walk-through/showcase useful. My email's right in the bottom there if you have questions, don't be a stranger.